
On this page
- Quick answers
- The standards behind a stucco installation
- Block or frame: the first question
- Stucco over concrete block, step by step
- Stucco on wood frame walls, step by step
- Control joint spacing
- Termination details: where stucco stops
- Windows, doors, trim and foam bands
- Where a frame wall sits on a block wall
- What to check on a finished stucco job
- Questions to ask before you hire a stucco installer
- Frequently asked questions
It is a guide, not the code. Your permit drawings, the product maker's instructions and your local building official have the final say.
Florida builders have long relied on the guide Indian River County's Building Division wrote for this purpose, aimed at the "common installation and proper application issues found during field inspections." That guide was based on the 2010 Florida Building Code, and the county now files it with its previous code-year documents. This page takes the same field-first approach, updated to the current code.
Quick answers
| Question | Short answer | Where it comes from |
|---|---|---|
| How many coats? | Three over lath (frame walls). Two applied directly over concrete block or poured concrete. | Florida Building Code, Residential R703.7.2 |
| How thick is stucco? | About 7/8 inch over lath on a frame wall. About 1/2 inch over concrete block. | ASTM C926; FBC Residential Table R702.1(1) |
| How high does stucco stop above the ground? | The weep screed sits at least 4 inches above soil and 2 inches above paving. | FBC Residential R703.7.2.1 |
| How far apart are control joints? | Wall panels of 144 square feet or less, no more than 18 feet in either direction, no longer than 2.5 times their width. | ASTM C1063 |
| How long between coats? | Each coat stays moist at least 48 hours. In three-coat work, the finish coat waits at least 7 days after the second coat, unless the installer follows the ASTM C926 method the code allows instead. | FBC Residential R703.7.4 and R703.7.5 |
| What goes behind stucco on a wood wall? | A water-resistive barrier that performs like two separate layers of Grade D paper. | FBC Residential R703.7.3 |
| Is there an inspection before plaster? | Yes. Florida's code calls for a lath inspection after the lath is up and before any plaster goes on. | FBC Building 110.3.5 |
The standards behind a stucco installation
Four documents decide how traditional stucco goes on in Florida:
- The Florida Building Code. The Residential volume, Section R703.7, covers exterior plaster on houses: lath, coats, weep screeds, water-resistive barriers and cure times. The Building volume adds the lath inspection.
- ASTM C926, the standard for applying portland cement plaster: mixes, coats, thickness, curing and how stucco meets other materials.
- ASTM C1063, the standard for installing the lath and accessories underneath: fastening, laps, control joints and weep screeds.
- ASTM C1861, the standard for the accessories themselves, including the definition of a weep screed.
"One-coat" stucco systems are different. They are proprietary products, installed under the manufacturer's evaluation report rather than the three-coat method below. Our guide to 1-coat vs. 3-coat stucco explains the difference. EIFS (synthetic stucco) is a separate system again and isn't covered here.
Block or frame: the first question
Everything about the job depends on what the stucco goes over.
Concrete block or poured concrete. Most Florida homes, especially older ones, have block walls. In Fort Lauderdale, for example, 98.6% of single-family homes on the 2026 Florida Department of Revenue tax roll have concrete or block walls (see the Fort Lauderdale page). Stucco bonds straight to block, so it usually goes on without lath, paper or a weep screed.
Wood frame. Frame walls show up on newer homes, additions, second stories and gable ends. Stucco can't bond to plywood or OSB, so it goes on over a water-resistive barrier and metal lath, in three coats, with a weep screed at the bottom.
Many Florida homes have both: a block first floor and a frame second floor or addition. That transition needs its own detail, covered below.
Stucco over concrete block, step by step
- Clean and prepare the wall. The surface needs to be clean and sound. Form ties and other obstructions are removed or trimmed flush with the wall. Indian River County's guide notes that any nails trimmed flush and left in place, such as masonry cut nails, should be corrosion resistant, like the lath and accessories.
- Make sure the stucco will bond. Where ASTM C926 requires it, the installer uses a bonding agent made for exterior plaster. Other accepted methods are a dash coat, roughening the surface, or metal lath.
- Set the edges. Casing bead or other accessories go where the stucco stops: at the bottom of the wall, around openings and at the edges of panels.
- Apply two coats. A base coat of about 3/8 inch and a finish coat of about 1/8 inch, for about 1/2 inch total over block. Poured concrete takes a thinner base coat (Indian River County's guide lists 1/4 inch plus a 1/8 inch finish). A three-coat system over block is also allowed.
- Keep it damp and wait. Each coat stays moist for at least 48 hours, and in two-coat work the finish coat waits at least 7 days after the base coat, unless the installer follows the ASTM C926 method the code allows instead (FBC Residential R703.7.4 and R703.7.5).
A weep screed isn't required when stucco goes straight onto masonry or concrete, according to the Stucco Manufacturers Association. The bottom edge still needs a clean stop, usually a casing bead.
Stucco on wood frame walls, step by step
Stucco layers on a frame wall, from the inside out
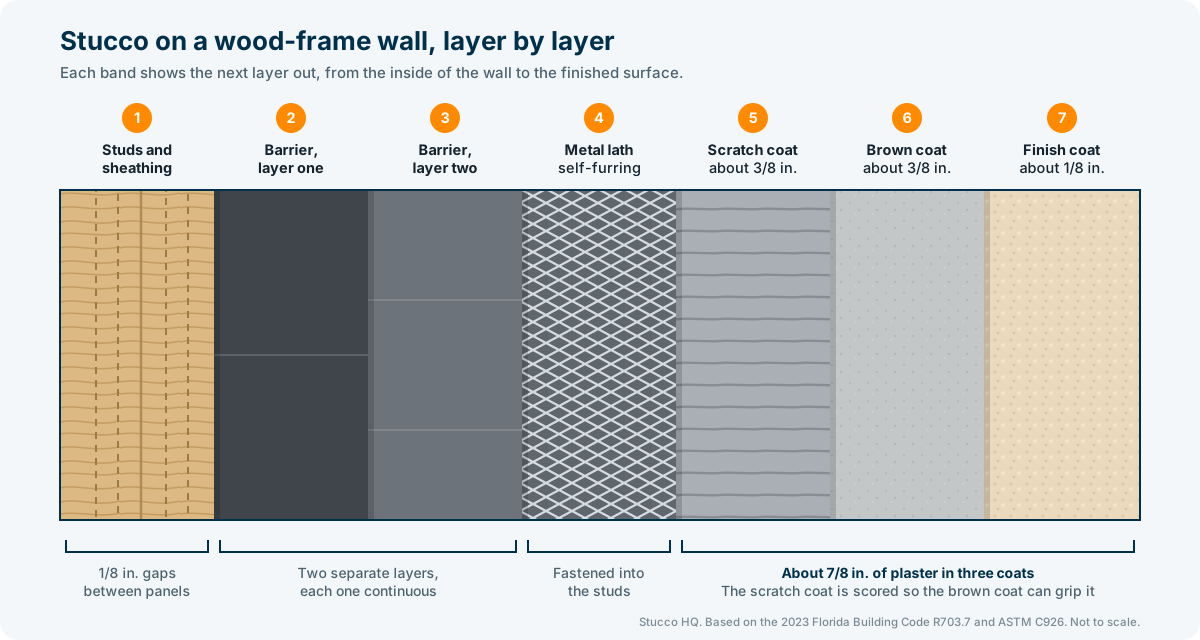
- Wood studs and plywood or OSB sheathing
- Water-resistive barrier, first layer
- Water-resistive barrier, second layer (or paper-backed lath)
- Self-furring metal lath, fastened into the studs
- Scratch coat, about 3/8 inch
- Brown coat, about 3/8 inch
- Finish coat, about 1/8 inch
That adds up to about 7/8 inch of plaster, the thickness ASTM C926 sets for three-coat stucco over metal lath. The same answer applies to stucco over plywood: plaster never goes directly onto the plywood. It goes onto lath, over the barrier, at about 7/8 inch.
1. Gap the sheathing
Plywood and OSB panels need a small gap between them so they can move without pushing on the stucco. Indian River County's guide calls for at least 1/8 inch. If the bottom edge of a panel stays exposed, Indian River County's guide calls for an exterior-rated panel or a protective detail approved by the building official.
2. Install two layers of water-resistive barrier
Over wood sheathing, the 2023 Florida code (R703.7.3) calls for a barrier that performs at least as well as two layers of Grade D paper. Each layer has to form its own continuous plane, and window and door flashing that drains to the barrier is directed between the two layers. The outer layer acts as a bond break: the plaster grips it, and the inner layer stays clear to carry water down and out.
The code allows one exception: a barrier at least as water resistant as 60-minute Grade D paper, kept apart from the stucco by a layer that doesn't absorb water, or by a designed drainage space.
The barrier, lath and stucco continue to the top plate of the wall, including behind soffits. Indian River County's guide also asks installers to keep the barrier tight into inside corners, so the lath doesn't puncture it.
3. Set the weep screed
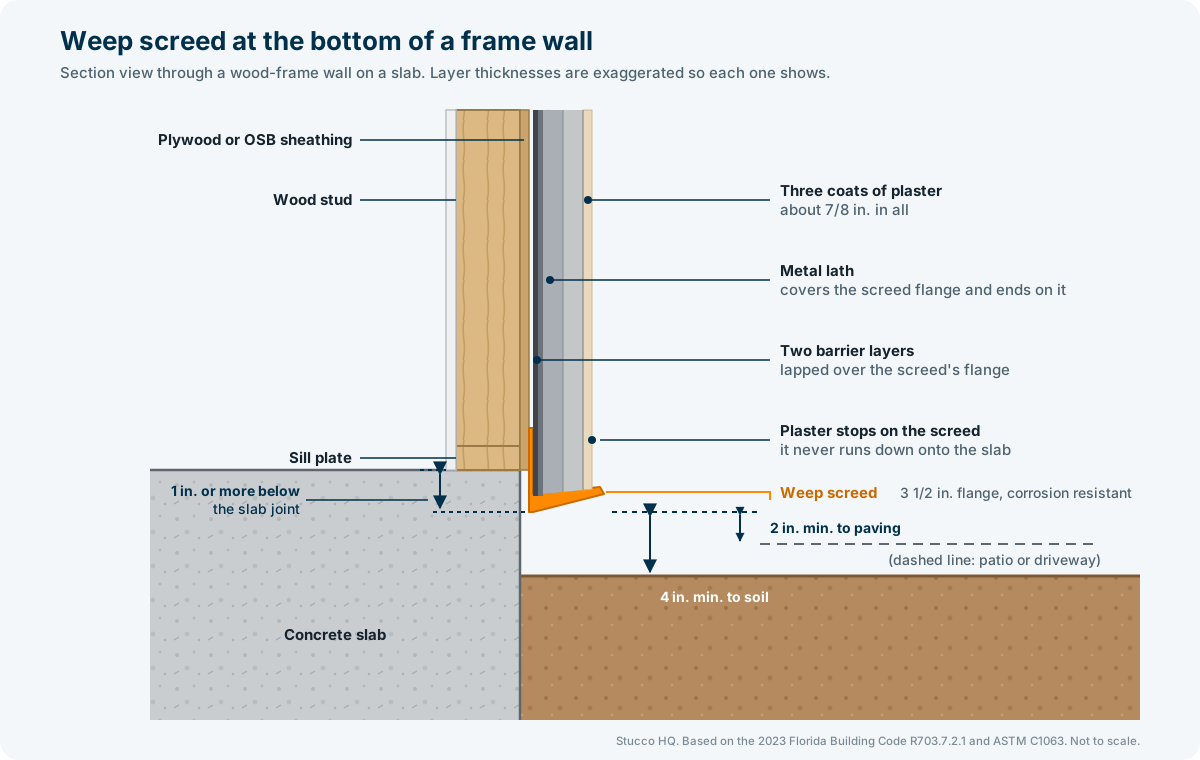
The weep screed is the metal or plastic strip at the bottom of a frame wall where stucco ends and any water behind it drains out. Under FBC Residential R703.7.2.1, it must be:
- corrosion resistant, at least 0.019 inch (No. 26 gauge) if galvanized steel, or plastic
- at or below the foundation plate line, with a vertical attachment flange at least 3 1/2 inches tall
- at least 4 inches above soil and 2 inches above paved surfaces
- lapped by the water-resistive barrier, with the lath covering the flange and ending on it
ASTM C1063 adds that the bottom edge sits at least 1 inch below the joint between the foundation and the framing. On a slab home, the code says the plaster covers the lath, paper and screed but doesn't extend below them.
4. Fasten the lath into the framing
Metal lath has to be corrosion resistant, and it is fastened into the studs, not just the sheathing. Under ASTM C1063:
- fasteners are no more than 7 inches apart along each framing member
- into studs, use 6d common nails, 1-inch roofing nails or 1-inch staples with a 3/4-inch crown, reaching at least 3/4 inch into the wood
- into horizontal framing, use 1 1/2-inch roofing nails
- staples engage at least three strands of the lath
- lath overlaps 1/2 inch at the sides and 1 inch at the ends, and side laps are wire-tied between framing members at least every 9 inches
Self-furring lath holds itself slightly off the wall so the scratch coat can wrap around it and lock in. The lath type and weight have to match the framing spacing in ASTM C1063's tables.
5. Install the accessories
Casing bead goes around windows and doors, corner bead on outside corners, and control joints wherever the layout calls for them (see control joint spacing below). Accessories have perforated or expanded flanges so the plaster fully embeds them, and they're sized for the full 7/8 inch of plaster.
Indian River County's guide recommends a strip of self-adhering flashing under trim, bands and accessories, where their fasteners pass through the barrier.
6. Pass the lath inspection
Florida Building Code 110.3.5 calls for a lath inspection once the lath is in place and before any plaster is applied. On a permitted job, this is the point where the barrier, flashing, weep screed and fastening are checked, while they're still visible.
7. Scratch coat
The first coat, about 3/8 inch, is pushed into the lath and scored with horizontal grooves so the next coat can grip it. It stays moist for at least 48 hours.
8. Brown coat
The second coat, also about 3/8 inch, goes on at least 48 hours after the scratch coat (FBC Residential R703.7.5). It's straightened to a flat, even surface and kept moist for at least 48 hours.
9. Finish coat
The finish coat, about 1/8 inch, carries the texture and often the color. Under the code's default schedule, it goes on at least 7 days after the brown coat. The code also accepts installations done to ASTM C926, which includes an alternative timing method in its appendix. Florida heat and wind dry stucco fast, so the installer keeps each coat damp as weather requires.
Watch a frame-wall stucco job
Video: "How to stucco wood homes. Complete video with city inspections," by Kirk Giordano Plastering, a California plastering contractor. Stucco HQ is not affiliated with them. California requirements differ from Florida's in places, so for a Florida home, follow the Florida Building Code steps above.
Control joint spacing
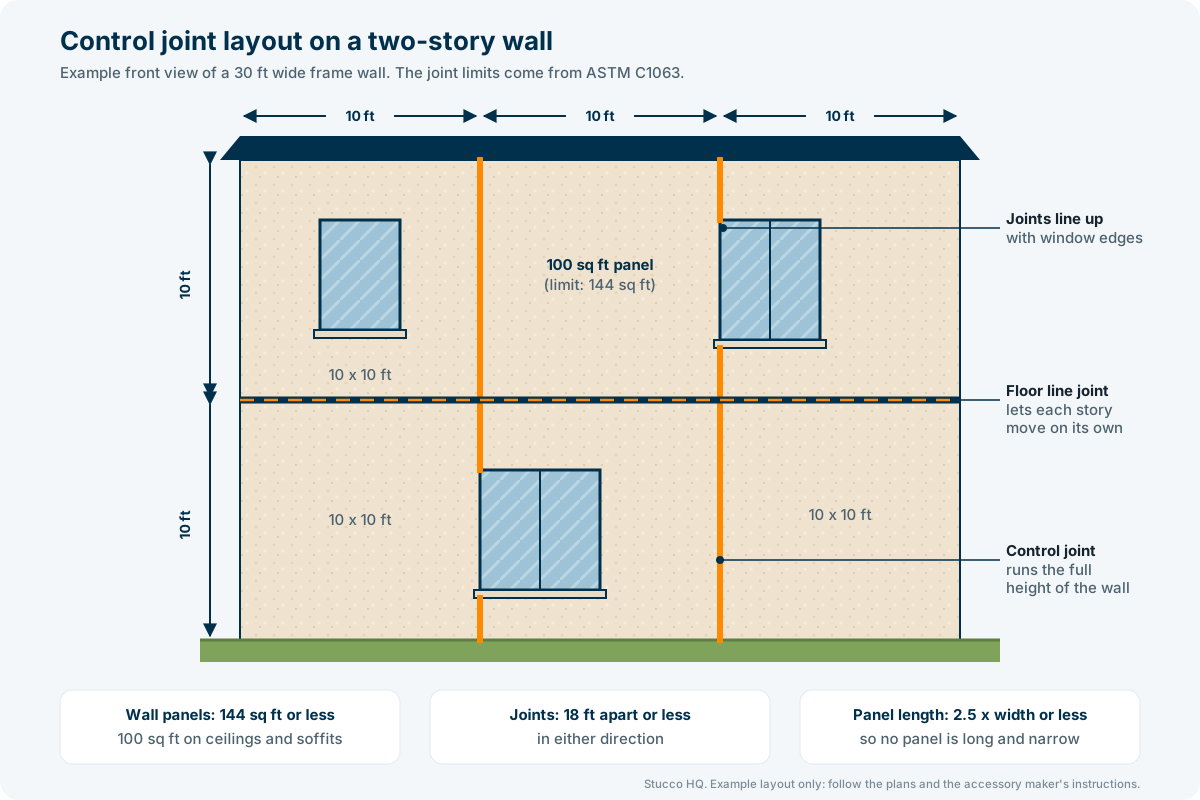
Stucco shrinks slightly as it cures, and walls move. Control joints give that movement a straight, planned line to follow instead of a random crack. ASTM C1063 sets the limits:
- Wall panels: 144 square feet or less
- Horizontal and curved surfaces (ceilings, soffits, arches): 100 square feet or less
- Spacing: no more than 18 feet apart in either direction
- Shape: no panel longer than 2.5 times its width
Joints also belong where ceiling framing changes direction, and wherever the building itself has an expansion joint. Indian River County's guide adds the usual spots for control joints: off the corners of windows and doors, at plate lines and floor lines, and where different substrates meet. Expansion joints go where more movement is expected, such as floor lines on multistory frame walls.
A few installation details matter:
- The barrier runs continuously behind the joint.
- ASTM C1063 calls for the lath to stop at each side of a control joint. The Stucco Manufacturers Association notes that most manufacturers also accept continuous lath behind one-piece joints. Follow the plans and the accessory maker's instructions.
- Vertical joints run unbroken. Horizontal joints are cut to butt into them, and the ends and intersections are bedded in sealant.
- Joints continue through decorative bands so the bands don't lock the panels together.
Even with correct joints, the Stucco Manufacturers Association is clear that no layout guarantees crack-free stucco: joints reduce hairline cracking. Hairline cracks are common and usually cosmetic. Our guide to fixing hairline cracks in stucco covers what to do about them.
Termination details: where stucco stops
Water problems in stucco often start at an edge. These are the edges to get right:
- At the ground: on frame walls, the weep screed sits at least 4 inches above soil and 2 inches above paving. Landscaping projects often raise soil or add pavers later, so this is worth checking again after yard work.
- At the weep screed: a hairline gap forms between the stucco and the screed's nose as the plaster cures. The Stucco Manufacturers Association says this gap is how the wall drains, and it should not be sealed.
- At roofs: Indian River County's guide calls for the stucco to stop at least 2 inches above the roof surface where a wall meets a roof.
- At windows, doors and other materials: stucco is separated from the frame with casing bead, and the joint is closed with backer rod and sealant.
- At the top of the wall: the barrier, lath and stucco run all the way to the top plate, including behind soffits.
Windows, doors, trim and foam bands
Windows and doors are flashed into the water-resistive barrier before the lath goes on, as the code's flashing section (R703.4) requires. Where stucco meets the window or door frame, Indian River County's guide, citing the Florida code and ASTM C926, calls for a separation closed with backer rod and sealant.
Decorative foam bands, accent strips and trim are common on Florida homes. On frame walls, Indian River County's guide recommends installing them over the brown coat, with adhesive and as few fasteners as possible, instead of directly over the lath. The guide also lists alternatives for mounting them on the lath, such as flashing the feature or isolating it from the stucco with a sealant joint, when the detail is shown on the plans and approved by the building official.
New windows, doors, shutters and plumbing often mean cutting and patching stucco around the opening. See stucco repair for how patches are blended in.
Where a frame wall sits on a block wall
A frame second story or addition sitting on a block wall is a very common Florida detail. Water that runs down behind the stucco on the frame wall needs a way out at the transition. Indian River County's guide calls for flashing or another approved drainage method at the base of the framed wall, and one-piece and two-piece accessories are made for this.
The guide also recommends raising the bottom of the wood sheathing off the concrete and aligning it with the face of the wall below, which takes a straight, true wall underneath. On multistory frame walls, it suggests a weep screed or expansion joint at each floor line so water behind the plaster can drain.
What to check on a finished stucco job
You don't need to be a plasterer to spot most problems. Walk the house and look for:
- Weep screed clearance (frame walls): is there at least 4 inches between the weep screed and the soil, and 2 inches above patios and driveways?
- Weep gap: is the hairline gap at the weep screed open, not caulked shut?
- Bottom edge (frame walls): does the stucco stop at the weep screed instead of running down over the slab or into the ground?
- Control joints: do large walls have joints that divide them into panels of about 144 square feet or less?
- Window corners: are there cracks running out from the corners of windows and doors?
- Sealant: is there sealant where stucco meets windows, doors, light fixtures and pipes, and is it still flexible?
- Stains: are there dark streaks or damp areas below windows or along the base of walls?
If you find cracks or staining, our guides to stucco crack repair and stucco water damage explain the likely causes and fixes.
Questions to ask before you hire a stucco installer
- Is this a three-coat system or a one-coat system? Either can be right. Know which one you're getting and what it costs.
- What water-resistive barrier goes on the frame walls? Two layers, or an approved alternative?
- Who calls for the lath inspection, and will the permit be closed out at the end?
- Where will the control joints go? Ask to see the layout before lath goes up.
- How long will each coat cure, and how will it be kept damp in the heat?
- What warranty comes with the work, and is it written into the estimate?
Planning new stucco, an addition or a full re-stucco? Your local Stucco HQ contractor looks at the walls in person and gives you a free written estimate. See stucco installation and stucco replacement, or find your city.
Frequently asked questions
How thick is stucco over plywood?
About 7/8 inch, in three coats, over lath and two layers of water-resistive barrier. Stucco is never applied directly to plywood or OSB.
How many layers does stucco have?
Three coats over lath on frame walls: a scratch coat, a brown coat and a finish coat. Two coats directly over concrete block or poured concrete. Behind the stucco on a frame wall there is also lath and two layers of water-resistive barrier.
How far above the ground should stucco stop?
The weep screed at the bottom of a frame wall sits at least 4 inches above soil and 2 inches above paved surfaces (FBC Residential R703.7.2.1).
What is the control joint spacing for stucco?
Panels of no more than 144 square feet on walls and 100 square feet on ceilings and soffits, no more than 18 feet apart in either direction, and no longer than 2.5 times their width (ASTM C1063).
How long should stucco cure between coats?
Each coat stays moist for at least 48 hours. In three-coat work, the brown coat goes on at least 48 hours after the scratch coat, and the finish coat at least 7 days after the brown coat, unless the installer follows the ASTM C926 method the code allows instead (FBC Residential R703.7.4 and R703.7.5).
Does stucco on concrete block need a weep screed?
No. When stucco is applied directly to block or concrete, a weep screed isn't required. The bottom edge is usually finished with a casing bead.
What is the difference between ASTM C926 and ASTM C1063?
ASTM C926 covers the plaster: mixes, coats, thickness and curing. ASTM C1063 covers what goes under it: lath, fastening, accessories, control joints and weep screeds. The Florida Building Code points to both.
Sources and data used on this page
The figures and facts on this page come from public records and official sources. Links open in a new tab.
Florida guides and data
- Stucco Installation, Procedures and Guidelines Indian River County Building Division The county field guide this page brings up to the current code.
- 2026 final real property tax roll (NAL), Broward County Florida Department of Revenue The share of block and frame homes in Fort Lauderdale.
Florida code and inspections
- 2023 Florida Building Code, Residential, 8th Edition International Code Council Coats, thickness, weep screeds, water-resistive barriers and cure times.
- 2023 Florida Building Code, Building, 8th Edition International Code Council The lath inspection before any plaster goes on.
- 2023 Florida Building Code, 8th Edition: Minimum Required Inspections Bay County The lath inspection in the list of required inspections.
- The FBC & ASTM C 1063 Florida Building Commission continuing education course How the Florida code and ASTM C1063 fit together.
Industry standards
- C926-26 Standard Specification for Application of Portland Cement-Based Plaster ASTM International Plaster mixes, coats, thickness and curing.
- C1063-26 Standard Specification for Installation of Lathing and Furring to Receive Interior and Exterior Portland Cement-Based Plaster ASTM International Lath, fastening, laps, control joints and weep screeds.
- C1861-23a Standard Specification for Lathing and Furring Accessories, and Fasteners, for Interior and Exterior Portland Cement-Based Plaster ASTM International The accessories, including the definition of a weep screed.
- TechTimes: Weep Screed for Stucco Stucco Manufacturers Association Weep screeds, the drainage gap and stucco on block.
- TechTimes: Control Joints for Stucco Stucco Manufacturers Association Control joints, continuous lath and hairline cracking.
Last reviewed:
Stucco HQ is not affiliated with Indian River County, the International Code Council, ASTM International or the Stucco Manufacturers Association. Last checked against the 2023 Florida Building Code (8th Edition) on October 28, 2026. We'll update this guide when the next edition takes effect.